Developer Guide
- Acknowledgements
- Setting up, getting started
- Design
- Implementation
- Documentation, logging, testing, configuration, dev-ops
- Appendix: Requirements
- Appendix: Instructions for manual testing
- Appendix: Planned Enhancements
- Appendix: Effort
Acknowledgements
- AddressBook-Level3 (AB3): The original source code for this application was adapted from the AddressBook-Level3 project created by the SE-EDU initiative.
- NRIC Checksum: Documentation for NRIC checksum. Link
- JavaFX: Used for the Graphical User Interface (GUI). Link
- JUnit5: Used for the unit testing framework. Link
- PlantUML: Used to generate the diagrams in this documentation. Link
- Icons: PNG Icons from ICONPACKS
Setting up, getting started
Refer to the guide Setting up and getting started.
Design
Architecture
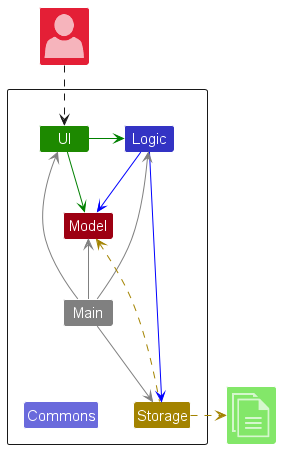
The Architecture Diagram given above explains the high-level design of the App.
Given below is a quick overview of main components and how they interact with each other.
Main components of the architecture
Main (consisting of classes Main and MainApp) is in
charge of the app launch and shut down.
- At app launch, it initializes the other components in the correct sequence, and connects them up with each other.
- At shut down, it shuts down the other components and invokes cleanup methods where necessary.
The bulk of the app’s work is done by the following four components:
-
UI: The UI of the App. -
Logic: The command executor. -
Model: Holds the data of the App in memory. -
Storage: Reads data from, and writes data to, the hard disk.
Commons represents a collection of classes used by multiple other components.
How the architecture components interact with each other
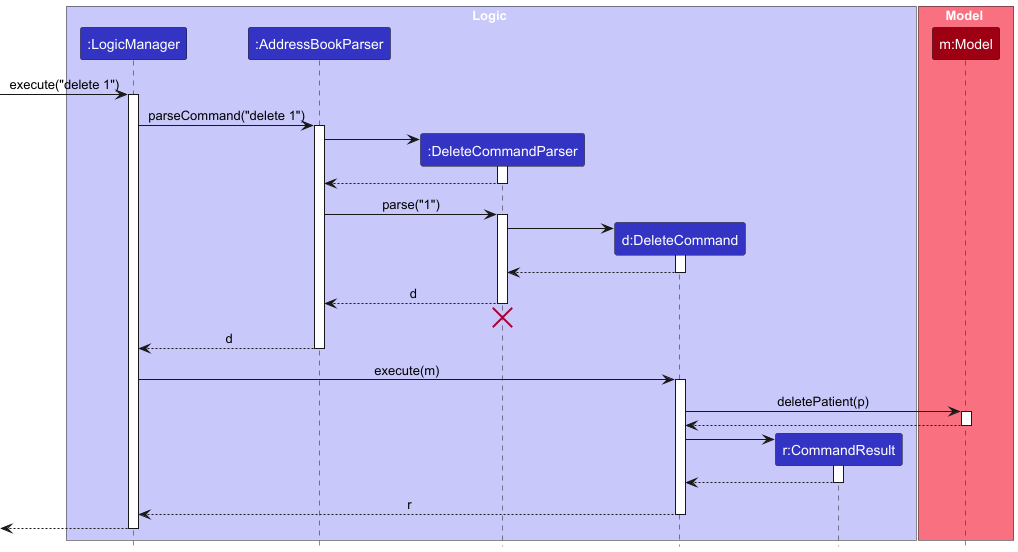
The Sequence Diagram below shows how the components interact with each other for the scenario where the user issues
the command delete 1.

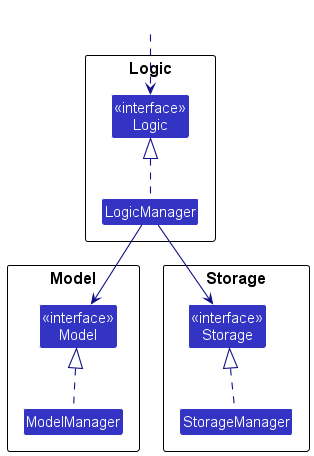
Each of the four main components (also shown in the diagram above),
- defines its API in an
interfacewith the same name as the Component. - implements its functionality using a concrete
{Component Name}Managerclass which follows the corresponding APIinterfacementioned in the previous point.
For example, the Logic component defines its API in the Logic.java interface and implements its functionality using
the LogicManager.java class which follows the Logic interface. Other components interact with a given component
through its interface rather than the concrete class (reason: to prevent outside component’s being coupled to the
implementation of a component), as illustrated in the (partial) class diagram below.
The sections below give more details of each component.
UI component
The API of this component is specified in Ui.java
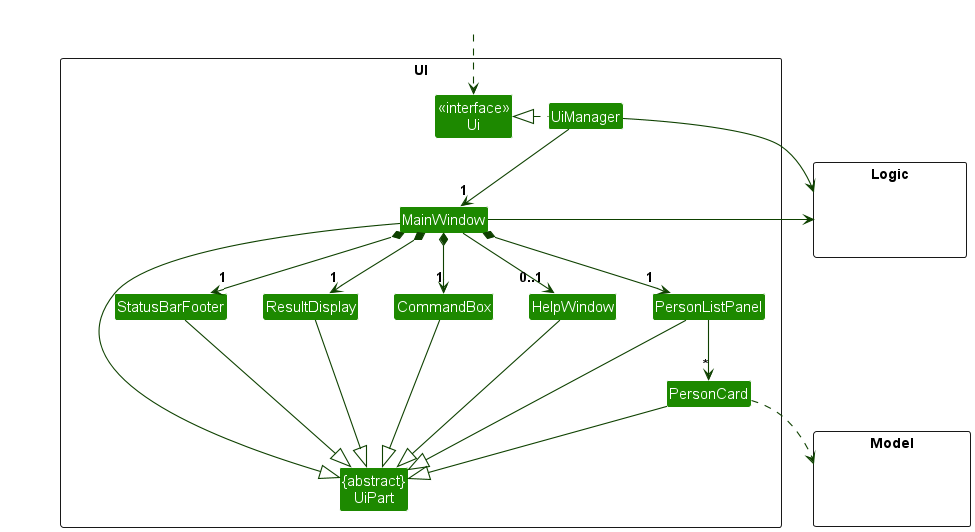
The UI consists of a MainWindow that is made up of parts e.g., CommandBox, ResultDisplay, PatientListPanel,
StatusBarFooter etc. All these, including the MainWindow, inherit from the abstract UiPart class which captures
the commonalities between classes that represent parts of the visible GUI.
The UI component uses the JavaFX UI framework. The layout of these UI parts are defined in matching .fxml files that are in the src/main/resources/view folder. For example, the layout of the MainWindow is specified in MainWindow.fxml
The UI component,
- executes user commands using the
Logiccomponent. - listens for changes to
Modeldata so that the UI can be updated with the modified data. - keeps a reference to the
Logiccomponent, because theUIrelies on theLogicto execute commands. - depends on some classes in the
Modelcomponent, as it displaysPatientobject residing in theModel.
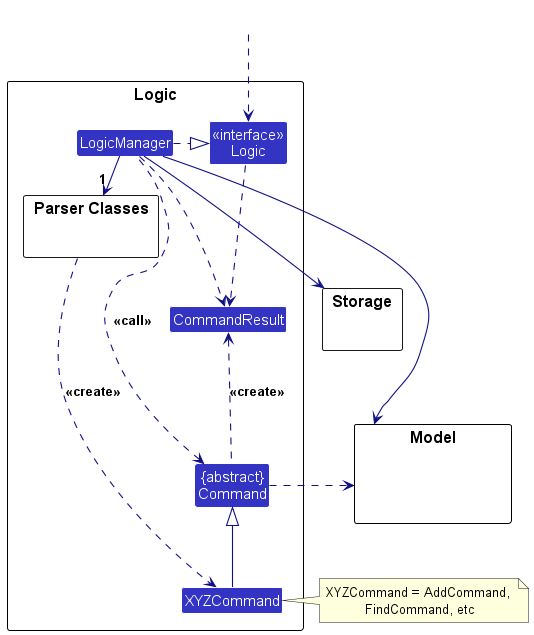
Logic component
API : Logic.java
Here’s a (partial) class diagram of the Logic component:
The sequence diagram below illustrates the interactions within the Logic component, taking execute("delete 1") API
call as an example.
DeleteCommandParser should end at the destroy marker (X) but due to a limitation of PlantUML, the lifeline continues till the end of diagram.
How the Logic component works:
- When
Logicis called upon to execute a command, it is passed to anAddressBookParserobject which in turn creates a parser that matches the command (e.g.,DeleteCommandParser) and uses it to parse the command. - This results in a
Commandobject (more precisely, an object of one of its subclasses e.g.,DeleteCommand) which is executed by theLogicManager. - The command can communicate with the
Modelwhen it is executed (e.g., to delete a patient).
Note that although this is shown as a single step in the diagram above (for simplicity), in the code it can take several interactions (between the command object and theModel) to achieve. - The result of the command execution is encapsulated as a
CommandResultobject which is returned back fromLogic.
Here are the other classes in Logic (omitted from the class diagram above) that are used for parsing a user command:

How the parsing works:
- When called upon to parse a user command, the
AddressBookParserclass creates anXYZCommandParser(XYZis a placeholder for the specific command name e.g.,AddCommandParser) which uses the other classes shown above to parse the user command and create aXYZCommandobject (e.g.,AddCommand) which theAddressBookParserreturns back as aCommandobject. - All
XYZCommandParserclasses (e.g.,AddCommandParser,DeleteCommandParser, …) inherit from theParserinterface so that they can be treated similarly where possible e.g., during testing.
Model component
API : Model.java
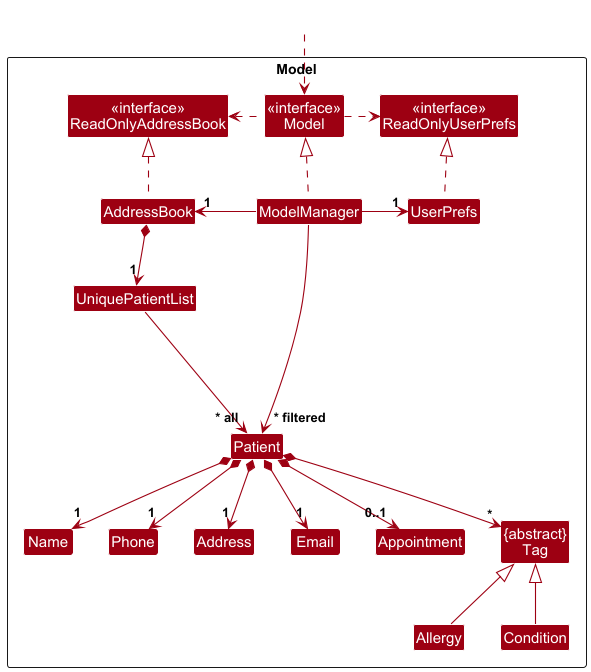
The Model component,
- stores the address book data i.e., all
Patientobjects (which are contained in aUniquePatientListobject). - stores the currently ‘selected’
Patientobjects (e.g., results of a search query) as a separate filtered list which is exposed to outsiders as an unmodifiableObservableList<Patient>that can be ‘observed’ e.g., the UI can be bound to this list so that the UI automatically updates when the data in the list change. - stores a
UserPrefsobject that represents the user’s preferences. This is exposed to the outside as aReadOnlyUserPrefsobject. - does not depend on any of the other three components (as the
Modelrepresents data entities of the domain, they should make sense on their own without depending on other components)
Tag list in the AddressBook, which Patient references. This allows AddressBook to only require one Tag object per unique tag, instead of each Patient needing their own Tag objects.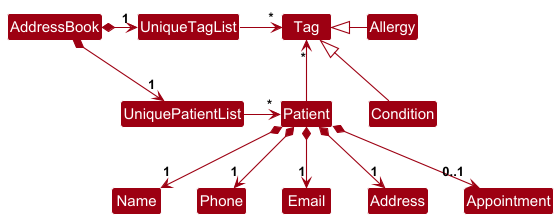
Storage component
API : Storage.java
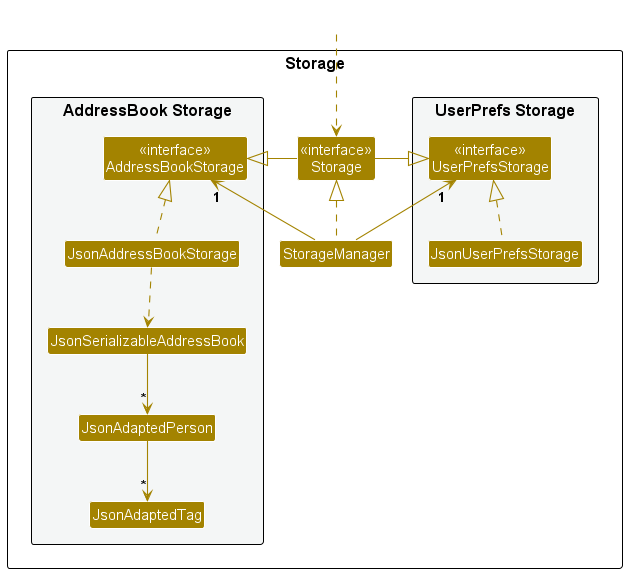
The Storage component,
- can save both address book data and user preference data in JSON format, and read them back into corresponding objects.
- inherits from both
AddressBookStorageandUserPrefStorage, which means it can be treated as either one (if only the functionality of only one is needed). - depends on some classes in the
Modelcomponent (because theStoragecomponent’s job is to save/retrieve objects that belong to theModel)
Common classes
Classes used by multiple components are in the doctorwho.commons package.
Implementation
This section describes some noteworthy details on how certain features are implemented.
NRIC validation feature
Context
NRIC/FIN is a core patient identifier and must be validated strictly. The app validates NRIC in two layers:
- Structure check: first letter + seven digits + checksum letter.
- Checksum check: Singapore NRIC/FIN modulus-11 checksum, including prefix-specific letter tables.
This prevents malformed or checksum-invalid NRIC values from entering the model.
Where validation happens
Validation is centralized in Nric (model), instead of being duplicated in parser/storage:
-
AddCommandParserandEditCommandParserparse theic/value and constructNric. -
JsonAdaptedPatientalso constructsNricduring JSON deserialization. -
Nric#isValidNric(String)is therefore the single source of truth for all input paths.
This design guarantees consistent behavior for CLI input, test fixtures, and persisted data loading.
Checksum algorithm
For an NRIC/FIN value with prefix P, digits d1..d7, and suffix letter L:
- Compute weighted sum using weights
[2, 7, 6, 5, 4, 3, 2]. - Add prefix offset:
-
+4forTandG -
+3forM -
+0forSandF
-
- Compute
remainder = sum mod 11. - Compute
checkDigit = 11 - (remainder + 1). - Map
checkDigitto letter table based on prefix group:S/T -> ABCDEFGHIZJF/G -> KLMNPQRTUWXM -> KLJNPQRTUWX
NRIC is valid only if the computed suffix letter equals the provided letter L.
Design considerations
Aspect: location of checksum logic
*Alternative 1 (chosen): keep checksum logic in Nric.
* Pros: one validation implementation across parser, model, and storage.
* Cons: parser tests must use checksum-valid NRIC fixtures.
*Alternative 2: validate in parser only. * Pros: simpler parser flow. * Cons: invalid values could still enter through storage or future non-parser paths.
Tests
NRIC behavior is covered by:
-
NricTest: constructor guardrails, normalization, format checks, checksum-valid and checksum-invalid cases. -
AddCommandParserTest: invalid NRIC parsing failures. -
JsonAdaptedPatientTest: invalid NRIC in JSON rejected during conversion.
In addition, shared test fixtures (e.g., TypicalPatients, PatientBuilder) use checksum-valid NRIC values to avoid
false failures.
Additional checksum-valid NRIC test values (You may copy and use these):
T0314597I
T0314598G

S1234567D
S1490542A

F9340704X
F8164046R

G3866432N
G7296071N

M8635947W
M3594121L
[Proposed] Automated Appointment Reminders
The proposed appointment reminder feature will alert the user of any upcoming appointments within the next 24 hours upon launching the application or while it is running.
Proposed Implementation
- A
ReminderManagerclass will be added to theLogiccomponent. -
ReminderManagerwill periodically query theModelfor patients with anAppointmentwhose start time falls within a specific threshold (e.g., next 24 hours). - The
UIwill be updated to include aReminderPanelthat observes theReminderManagerand displays upcoming appointments in a dedicated side panel or via visual indicators next to patient names.
Design considerations
Aspect: trigger mechanism for reminder refresh
*Alternative 1 (chosen): hybrid trigger (Model change events + periodic refresh).
* Pros: reminders stay up to date after command execution and remain accurate as time passes.
* Pros: avoids heavy continuous polling while app is idle.
* Cons: requires careful scheduling/lifecycle management to avoid duplicate refreshes.
*Alternative 2: fixed-interval polling only. * Pros: simpler implementation model. * Cons: can introduce stale reminders between poll intervals or unnecessary background work.
Aspect: reminder presentation strategy
*Alternative 1 (chosen): non-blocking reminder panel with optional visual markers. * Pros: supports continuous workflow without forcing modal interactions. * Pros: allows users to review reminders alongside patient data. * Cons: reminders may be less noticeable if users ignore side panels.
*Alternative 2: modal pop-up alerts. * Pros: high visibility for urgent reminders. * Cons: interrupts command flow and can be intrusive when multiple reminders are due.
Documentation, logging, testing, configuration, dev-ops
Appendix: Requirements
Product scope
Target user profile:
- has a need to manage a significant number of patient contacts and appointments
- prefer desktop apps over other types
- can type fast
- prefers typing to mouse interactions
- is reasonably comfortable using CLI apps
- may vary in technological confidence but prefers efficient keyboard-driven interaction
Value proposition: manage patient details like chronic conditions, severe allergies, and appointment scheduling faster than a typical mouse/GUI driven app
User stories
Priorities: High (must have) - ***, Medium (nice to have) - **, Low (unlikely to have) - *
| Priority | As an … | I want to … | So that I can … |
|---|---|---|---|
*** |
Admin Staff | add a new patient record | keep track of new patients |
*** |
Admin Staff | delete a patient record | keep my database clean of inactive patients |
*** |
Admin Staff | list all patients | see all the doctor’s patients at a glance |
*** |
Admin Staff | find a patient by name | quickly locate a specific patient’s record |
*** |
Admin Staff | add an appointment to a patient | track the doctor’s daily schedule |
*** |
Admin Staff | delete a patient’s appointment | remove outdated or cancelled appointments |
*** |
Admin Staff | list all appointments | view the doctor’s full schedule at a glance |
** |
less tech-savvy Admin Staff | have the program working immediately after opening | avoid having to install or configure anything |
** |
clumsy Admin Staff | edit an existing patient’s record | keep my database updated to the newest information |
** |
Admin Staff | filter appointments by a specific date | see the doctor’s schedule for that day |
** |
Admin Staff | add a patient’s drug allergies and medical conditions | help the doctor provide informed care |
** |
less tech-savvy Admin Staff | have a data file automatically created on first launch | start using the system without manual setup |
** |
Admin Staff | clear all patient records | start fresh with a clean database |
** |
Admin Staff | be alerted if I book two appointments at the same time | avoid double-booking the doctor |
** |
forgetful Admin Staff | search for a patient by a partial or misspelled name | find records quickly even if I do not remember the exact spelling |
* |
meticulous Admin Staff | add notes to an appointment | help the doctor remember important details for the visit |
* |
Admin Staff | be told when a search returns no results | know the system is working correctly |
* |
forgetful Admin Staff | input command arguments in any order | avoid memorising rigid syntax |
Use cases
The use cases operate with the following implicit preconditions, in addition to any ones stated explicitly:
- Staff has launched the DoctorWho application.
- Staff is at the DoctorWho command prompt.
(For all use cases below, the System is DoctorWho and the Actor is the Staff, unless specified otherwise)
Use Case 01: Add a Patient
MSS:
- Staff requests to add a new patient with the required details.
- DoctorWho adds the patient to the system.
-
DoctorWho shows a success message with the added patient’s details.
Use case ends.
Extensions:
- 1a. Missing mandatory fields (name, NRIC, sex, date of birth, phone, email, or address).
-
1a1. DoctorWho shows an error message.
Use case ends.
-
- 1b. Invalid field values.
-
1b1. DoctorWho shows an error message.
Use case ends.
-
- 1c. Added patient is a duplicate of an existing patient.
-
1c1. DoctorWho shows an error message.
Use case ends.
-
Postconditions:
- New patient appears at the bottom of the patient list.
Use Case 02: Delete a Patient
Preconditions:
- At least one patient exists in the list.
MSS:
- Staff requests to delete a specific patient using the index.
- DoctorWho removes the patient from the system.
-
DoctorWho shows a success message.
Use case ends.
Extensions:
- 1a. Invalid, missing or out of bounds index.
-
1a1. DoctorWho shows an error message.
Use case ends.
-
Postconditions:
- Patient is removed from the system.
Use Case 03: List Patients
MSS:
- Staff requests to list all patients.
- DoctorWho displays all patients in the list panel.
-
DoctorWho shows a success message.
Use case ends.
Extensions:
- 2a. No patients in the system.
-
2a1. DoctorWho shows an empty list and a success message indicating that there are no patients.
Use case ends.
-
Postconditions:
- All patients are displayed in the list panel.
Use Case 04: Edit a Patient’s Information
Preconditions:
- At least one patient exists in the list.
MSS:
- Staff requests to edit a specific patient’s information using the index.
- DoctorWho updates the patient’s information.
-
DoctorWho shows a success message with the updated details.
Use case ends.
Extensions:
- 1a. Invalid, missing or out of bounds index.
-
1a1. DoctorWho shows an error message.
Use case ends.
-
- 1b. No fields provided to edit.
-
1b1. DoctorWho shows an error message.
Use case ends.
-
- 1c. Invalid field values.
-
1c1. DoctorWho shows an error message.
Use case ends.
-
- 1d. Edited details result in a duplicate patient.
-
1d1. DoctorWho shows an error message.
Use case ends.
-
- 1e. Edited details are same as original patient.
-
1e1. DoctorWho shows an error message.
Use case ends.
-
- 1f. Staff provides allergies or conditions field with no value.
-
1f1. DoctorWho clears all existing conditions or allergies respectively.
Use case resumes from step 3.
-
Postconditions:
- Patient’s information is updated in the system.
Use Case 05: Schedule an appointment for an existing patient
Preconditions:
- At least one patient exists in the list.
MSS:
- Staff requests to add an appointment for a specific patient using the index.
- DoctorWho adds the appointment to the patient’s record.
-
DoctorWho shows a success message with the appointment details.
Use case ends.
Extensions:
- 1a. Invalid, missing or out of bounds index.
-
1a1. DoctorWho shows an error message.
Use case ends.
-
- 1b. Missing mandatory fields (datetime or duration).
-
1b1. DoctorWho shows an error message.
Use case ends.
-
- 1c. Invalid field values (e.g., invalid datetime format or duration out of range).
-
1c1. DoctorWho shows an error message.
Use case ends.
-
- 1d. New appointment overlaps with an existing appointment of another patient.
-
1d1. DoctorWho shows an error message.
Use case ends.
-
- 1e. New appointment is identical to the current appointment of the selected patient (i.e., start time, duration, and note are identical).
-
1e1. DoctorWho shows an error message.
Use case ends.
-
Postconditions:
- Appointment is added and visible in the patient detail panel.
Use Case 06: Delete Appointment
Preconditions:
- At least one patient exists in the list.
MSS:
- Staff requests to delete the appointment of a specific patient using the index.
- DoctorWho removes the appointment from the patient’s record.
-
DoctorWho shows a success message.
Use case ends.
Extensions:
- 1a. Invalid, missing or out of bounds index.
-
1a1. DoctorWho shows an error message.
Use case ends.
-
- 1b. Patient has no existing appointment.
-
1b1. DoctorWho shows an error message.
Use case ends.
-
Postconditions:
- Appointment is removed from the patient’s record.
Use Case 07: List Appointments
MSS:
- Staff requests to list appointments.
- DoctorWho displays all appointments.
-
DoctorWho presents the appointments in ascending start date-time order.
Use case ends.
Extensions:
- 1a. Staff requests to list appointments for a specific date.
- 1a1. DoctorWho displays only appointments on the specified date.
-
1a2. DoctorWho presents the results in ascending start date-time order.
Use case ends.
- 1b. Staff enters an invalid date value.
-
1b1. DoctorWho shows an error message.
Use case ends.
-
- 1c. Staff enters an invalid date format.
-
1c1. DoctorWho shows an error message.
Use case ends.
-
- 2a. There are no appointments to display.
-
2a1. DoctorWho shows an empty result list and a success message with 0 patients with appointments listed.
Use case ends.
-
Postconditions:
- The currently displayed list is updated to show appointment-based results.
- If a date is provided, only appointments on that date are shown.
Use Case 08: Find Patients
MSS:
- Staff requests to find patients by specifying a name keyword.
- DoctorWho displays all patients whose names contain the input keyword.
-
DoctorWho shows a success message with the number of patients found.
Use case ends.
Extensions:
- 1a. No patients found matching the keyword.
-
1a1. DoctorWho shows a success message with 0 patients listed.
Use case ends.
-
- 1b. Missing keyword.
-
1b1. DoctorWho shows an error message.
Use case ends.
-
Postconditions:
- Patient list panel displays only patients matching the input name.
Use Case 09: Clear All Patients
MSS:
- Staff requests to clear all patient records.
- DoctorWho removes all patients and their appointments from the system.
-
DoctorWho shows a success message.
Use case ends.
Postconditions:
- Patient list is empty.
Use Case 10: View Help
MSS:
- Staff requests to view help.
-
DoctorWho opens a help window with a link to the User Guide.
Use case ends.
Postconditions:
- Help window is displayed to the staff.
Use Case 11: Exit Application
MSS:
- Staff requests to exit the application.
-
DoctorWho closes the application.
Use case ends.
Postconditions:
- Application is closed.
Non-Functional Requirements
- Should work on any mainstream OS as long as it has Java
17or above installed. - Should be able to hold up to 1000 patient records without a noticeable sluggishness in performance for typical usage.
- A user with a typing speed of at least 50 WPM should be able to complete any mandatory CRUD task (e.g., adding a patient) faster than an equivalent GUI.
- Data must be saved locally in a human-readable JSON format to allow for manual inspection or external backup without using the app.
- The system should handle corrupted data files gracefully by notifying the user via a log message, ensuring continued operation without crashing, the corrupted file should not be overridden immediately to give the user a chance to rectify the issue.
- The system shall support full operation of all core application features in an offline environment without dependency on external servers or internet connectivity. Non-core features (e.g., external help resources or documentation links) may require internet access.
Glossary
- Mainstream OS: Windows, Linux, Unix, macOS. (Relevant to Setting up)
- Medical Tag: A general term encompassing both Medical Conditions (e.g., Diabetes) and Drug Allergies (e.g., Penicillin). (Relevant to Model Component)
- Overlap: A situation where a new appointment’s time interval (start time + duration) intersects with an existing appointment’s interval. (Relevant to Use Cases)
- Orphan Schedule: An appointment record that remains in the system after the associated patient has been deleted. DoctorWho prevents this via automated purging. (Relevant to NFR Section)
Appendix: Instructions for manual testing
Given below are instructions to test the app manually.
Launch and shutdown
- Initial launch
- Download the jar file and copy into an empty folder
-
Open a terminal, navigate to the folder and run
java -jar doctorwho.jarExpected: Shows the GUI with a set of sample patients. The window size may not be optimum.
- Saving window preferences
- Resize the window to an optimum size. Move the window to a different location. Close the window.
-
Re-launch the app using
java -jar doctorwho.jarExpected: The most recent window size and location is retained.
Adding a patient
- Adding a valid patient
-
Test case:
add n/John Doe ic/T0300000H x/M dob/01-01-2003 p/98765432 e/johnd@example.com a/123 Clementi AveExpected: Patient added at the bottom of the list. Success message shown with patient name.
-
- Adding a patient with missing mandatory fields
-
Test case:
add n/John Doe p/98765432Expected: No patient added. Error message shown with correct command format.
-
- Adding a duplicate patient
- Prerequisites: Patient
John Doewith NRICT0300000Halready exists (added in test case 1). -
Test case:
add n/John Doe ic/T0300000H x/M dob/01-01-2003 p/98765432 e/johnd@example.com a/123 Clementi AveExpected: No patient added. Error message indicating duplicate patient.
- Prerequisites: Patient
Deleting a patient
- Deleting a patient while all patients are being shown
- Prerequisites: List all patients using the
listcommand. Multiple patients in the list. -
Test case:
delete 1Expected: First patient is deleted from the list. Success message shown with patient name.
-
Test case:
delete 0Expected: No patient deleted. Error message shown.
-
Other incorrect delete commands to try:
delete,delete x(where x is larger than the list size)Expected: Similar to previous.
- Prerequisites: List all patients using the
Editing a patient
- Editing a patient’s phone number
- Prerequisites: At least one patient in the list.
-
Test case:
edit 1 p/91234567Expected: First patient’s phone number updated. Success message shown.
- Editing multiple fields of a patient (NRIC, phone, allergies, and medical condition)
- Prerequisites: At least one patient in the list.
- Test case:
edit 1 ic/T1234567J p/98557988 al/ mc/High BP
Expected: First patient’s NRIC and phone are updated, existing allergies are cleared, and the medical condition “High BP” is added. Success message shown.
- Editing a patient’s date of birth
- Prerequisites: At least one patient in the list.
-
Test case:
edit 1 dob/15-06-1995Expected: First patient’s date of birth updated. Success message shown.
- Clearing all allergies
-
Test case:
edit 1 al/Expected: All allergies removed from first patient. Success message shown.
-
- Editing with no fields provided
-
Test case:
edit 1Expected: No changes made. Error message shown.
-
Adding an appointment
- Adding a valid appointment
- Prerequisites: At least one patient in the list.
-
Test case:
apt 1 d/01-04-2026 09:00 dur/60 note/Follow-upExpected: Appointment added to first patient. Success message shown.
- Adding an appointment with invalid date format
-
Test case:
apt 1 d/2026-04-01 09:00 dur/60Expected: No appointment added. Error message showing correct date format.
-
- Adding an appointment with invalid duration
-
Test case:
apt 1 d/01-04-2026 09:00 dur/0Expected: No appointment added. Error message shown.
-
Deleting an appointment
- Deleting an existing appointment
- Prerequisites: Patient at index 1 has an existing appointment.
-
Test case:
dapt 1Expected: Appointment removed. Success message shown.
- Deleting appointment from patient with no appointment
- Prerequisites: Patient at index 1 has no appointment.
-
Test case:
dapt 1Expected: No changes made. Error message shown.
Listing appointments
- Listing all appointments
-
Test case:
lsaptExpected: All appointments listed in ascending date-time order. Success message shows number of appointments.
-
- Listing appointments by date
-
Test case:
lsapt d/01-04-2026Expected: Only appointments on 1 April 2026 shown.
-
- Invalid date format
-
Test case:
lsapt d/2026-04-01Expected: Error message showing correct date format.
-
Clearing all patients
-
Test case:
clearExpected: All patients and appointments removed. Success message shown.
Saving data
- Dealing with missing data file
- Close the app.
- Navigate to
[JAR file location]/data/and deletedoctorwho.json. -
Re-launch the app.
Expected: App starts with sample patient data. A new
doctorwho.jsonis created.
- Dealing with corrupted data file
- Close the app.
- Open
[JAR file location]/data/doctorwho.jsonin a text editor. - Delete a random line in the middle of the file and save.
-
Re-launch the app.
Expected: App starts with an empty patient list. Log message notifies the user that there was an issue loading the file. Corrupted data file is replaced with a new
doctorwho.jsononly if the user makes changes to the empty patient list.
Appendix: Planned Enhancements
Team size: 5
-
Include support for slashes (/) in patient name. Currently, we ask the user to remove slashes (e.g.,
s/obecomesso) when entering the patient’s name. However, this means that the stored patient name may not match their exact government name. We plan to implement apostrophe string enclosing to allow such special characters to be included in the name without conflicting with the special characters used for the argument prefixes. - Include cross-checks between a patient’s date of birth and NRIC. Currently, we do not check that the patient’s birth year matches their NRIC due to complexities and edge cases. Additionally, patients born before 1968 would not have their birth year as the first two digits of their NRIC, making this impossible in certain cases. We plan to implement a best-effort check that will flag possible mismatches.
-
Include confirmation for the
clearcommand to protect the user from unintentionally clearing all their data. We plan to make it so that the user has to enter two consecutive clear commands before the data is actually cleared. - Tracking of a patient’s appointment history. Currently, we allow the addition of appointments on past dates but only support one active appointment per patient. This is due to how small clinics operate whereby the follow-up appointment is made only once the user completes their current appointment. We plan to let multiple appointments be linked to a patient that way past appointments can be traced back to the patient. This will also allow a user transitioning from another system to DoctorWho to preserve their patients’ appointment histories.
-
Allow the user to manage patients across several doctors. Currently, the overlap check does not account for
different doctors, and trying to add another appointment at the same time will cause an overlap even if it might be
for another doctor at the clinic. We will implement this by adding a
Doctorfield to theAppointmentclass, which will then grant the user greater flexibility to track appointments by doctor and have concurrent appointments with different doctors. -
Enhance the
findcommand to support more precise string matching. Currently, thefindcommand performs OR-based matching against space separated keywords (e.g.,find James LeefindsJames Lee,James TanandMax Lee). We intend to allow users to enclose search keywords in apostrophes to get a more precise match, such thatfind "James Lee"only findsJames Lee. -
Enhance the
findcommand to search for NRIC. Currently, it performs matching across the name field only. Since it is possible for multiple patients to have the same or very similar names, we intend to makefindmore precise by allowing the user to search for patients by their full NRIC, which is unique to each patient. -
Make email an optional field. Currently, email is a mandatory field. Since not all patients have an email, this
forces users to enter placeholder values like
test@example.comfor patients without an email. We plan to make the email parameter optional when using the add command, so thatadd n/John Doe ic/T0300000H x/M dob/01-01-2003 p/98765432 a/123 Clementi Ave(withoute/) is accepted. -
Enhance the find command to support AND-based keyword matching. Currently, the
findcommand performs OR-based matching, meaningfind James Leereturns any patient whose name contains eitherJamesorLee. This can return too many unrelated results when the user intends to search for a specific patient. We plan to add toggleable AND-based matching, modifying thefindcommand to befind [PRED] KEYWORD [MORE_KEYWORDS]…, wherePREDis eitherORorANDand the command defaults to OR-based matching ifPREDis absent. This wayfind AND James Leeonly returns patients whose name contains bothJamesandLee.
Appendix: Effort
Difficulty level: DoctorWho is significantly more complex than AB3. While AB3 manages a single entity type (Person), DoctorWho manages two entity types (Patient and Appointment) with relationships between them, requiring changes across all architectural layers.
Challenges faced:
- Implementing the
Appointmententity required changes across Logic, Model, Storage, and UI layers simultaneously - Refactoring the generic
Tagclass into two specialised subclasses (AllergyandCondition) with separate validation rules, character limits, and regex patterns required careful design to maintain extensibility - Implementing overlap detection across all patients’ appointments required non-trivial logic in the Model layer
- Updating the UI to include a dedicated
PatientDetailPanelalongside the existing list panel required significant JavaFX work
Effort: Approximately equivalent to 1.5x the effort of AB3, given the addition of a second entity type and the tag hierarchy refactor.
Achievements:
- Successfully delivered all 7 MVP features on time
- Introduced a clean tag hierarchy (
Tag→Allergy/Condition) that is easily extensible for future tag types - Improved UI with a split-panel layout showing patient details alongside the patient list